Creating a Well-Architected VPC
So this is the first in my posts walking through how to deploy a solution in AWS. Hopefully you find it useful as VPCs are the foundation for private and secure networking in AWS and an area many struggle. This guide is designed to ensure that your VPC deployments can be Well-Architected and provide a base level of network security but is only one option for VPC layout. While it will meet a vast majority of workloads you might want to review the structure and reduce, or increase, the number of subnets as well as other components.
I will not go into CloudFormation templates structure, unless required, or deployment method. However, all templates are designed to be able to manually uploaded via the console and applied consecutively or the individual template you wish to deploy.
All code for this project can be found at my git organisation under the VPC 101 repository myawsrocks/vpc101.
What you'll create:
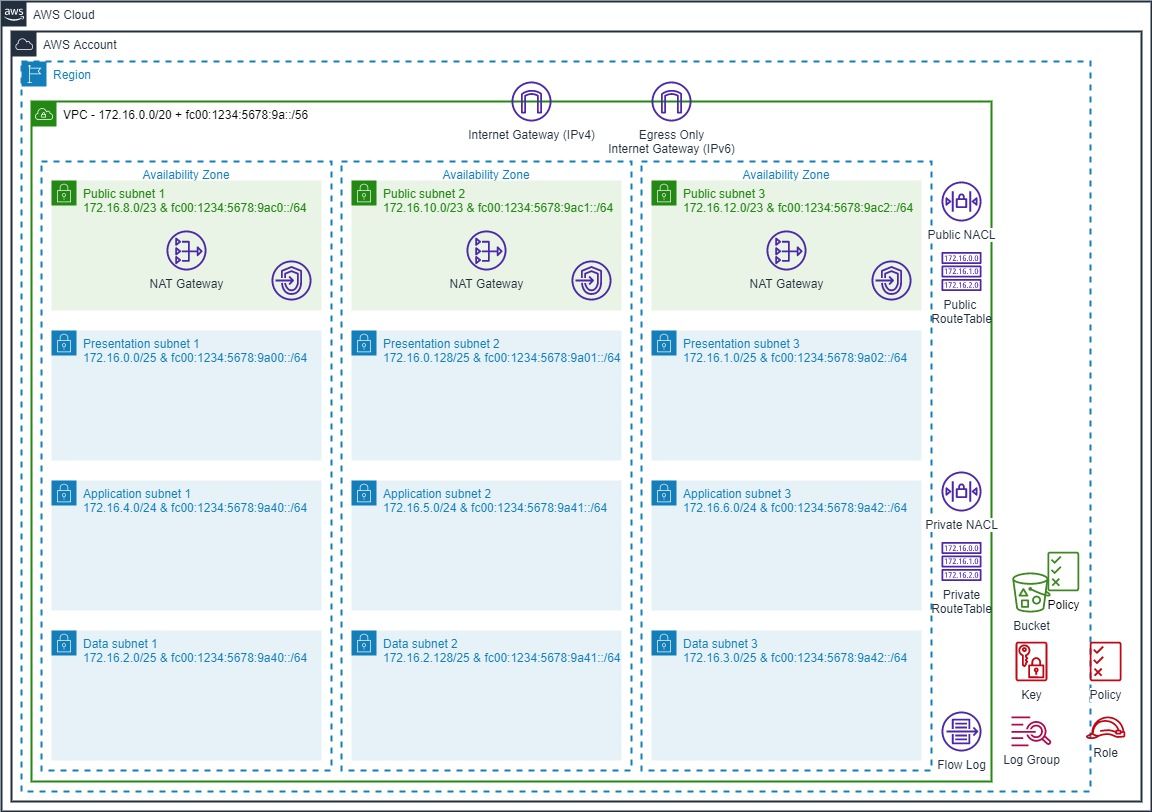
This solution will create the following topology with the option for a single (reduced redundancy) NAT Gateway. In addition we will enable encrypted VPC Flow logs that are stored in CloudWatch and S3. Generally the S3 bucket would be in a central security account but for our purpose we will create and secure it in the same account.
Well go through the each of the following steps with each step representing a unique CloudFormation template that you can deploy from my repo.
- Create an empty VPC with an IPv4 CIDR range.
- Create an IPv6 CIDR range and associate to the VPC.
- Create 9 private subnets with IPv4 and IPv6 IP ranges allocated.
- Create private route tables and associate to the private subnets.
- Enable VPC Flow Logs and send to encrypted S3 Bucket and CloudWatch Log Group:
- Deploy VPC Endpoints for common AWS Services.
- Create public subnets and internet access.
- Option for single NAT Gateway
Creating the base VPC
CloudFormation template: vpc_1.yaml
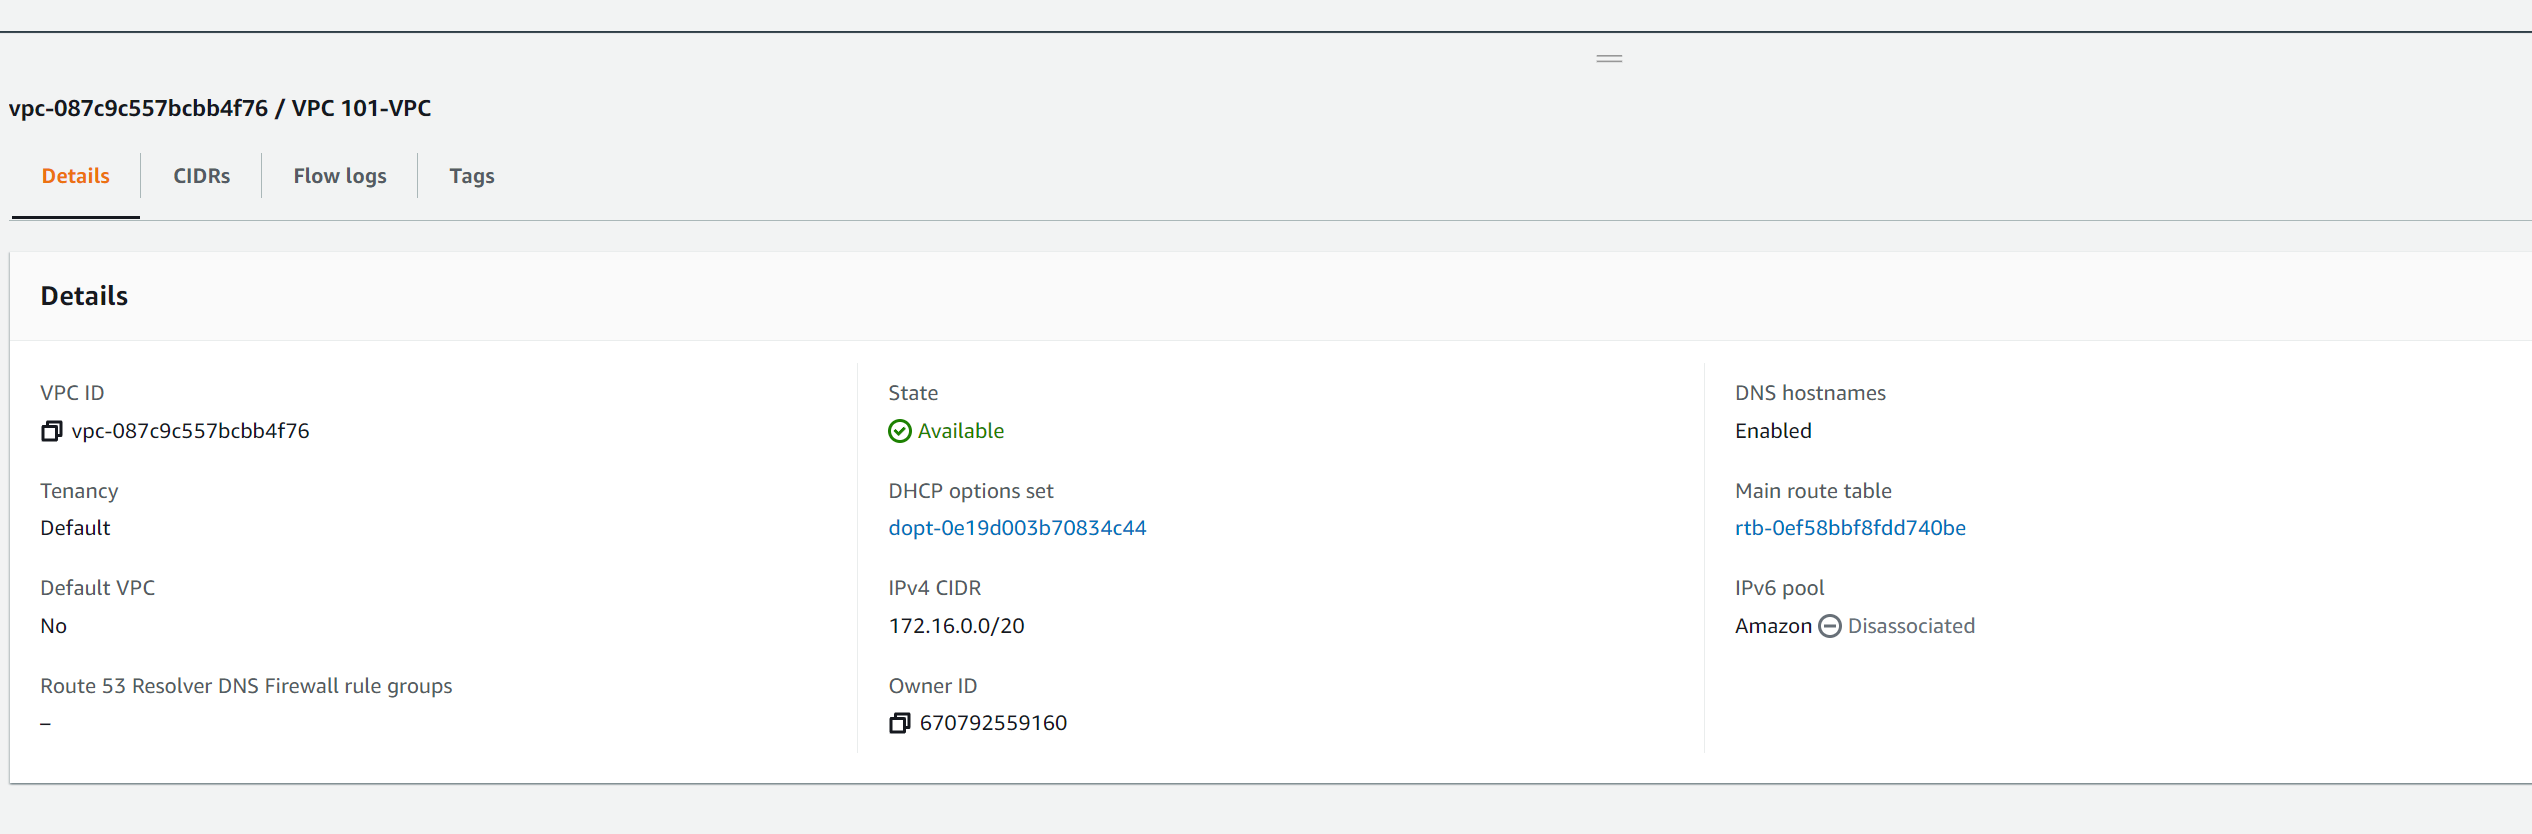
Unlike with the VPC wizard in the console, creating a VPC in code or via CLI only creates an empty VPC with the IP4 range (CIDR) you provide. In my example we'll use the default in the template of 172.16.0.0/20 but you can replace this with any range. Unless you have a large public IP range you want to consume I'd suggest an RCF1918 range (Private IPv4) which only has minor AWS restrictions in relation to secondary IP ranges (see the docs - working with vpcs).
Remember: If you are going to be connecting to other VPC's via VPC Peering or a Transit Gateway you need to ensure you do not assign the same IP range to multiple VPCs.
Once the CloudFormation Stack has completed you will be able to view your VPC in the console and see the attached IPv4 range.
Creating an IPv6 range and associate to VPC
CloudFormation template: vpc_2.yaml
Although IPv6 adoption is low, I promote its use as it offers many benefits if you are able to adopt it. Assigning and using an IPv6 range is simple and most services in AWS are able to run IPv4 and IPv6 and some services can now run IPv6 only.
As with IPv4, while you can use your own public IPv6 range in AWS, unless you have requirements to advertise these internally or externally it is simpler to utilize an AWS IPv6 range. These are public ranges so globally unique both between VPCs and on the internet.
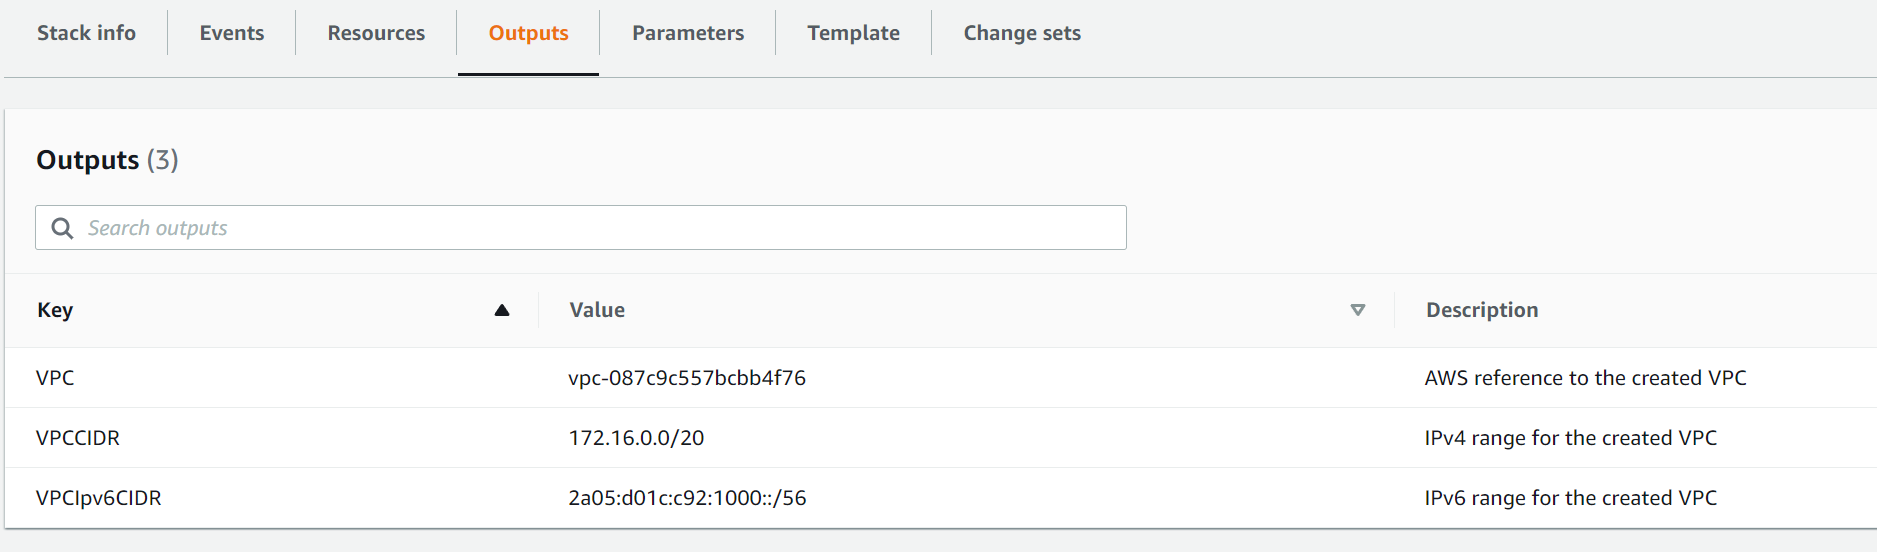
Updating the stack with IPv6 should only take a minute or two and once complete you will be able to see the assigned AWS IPv6 range in both the CloudFormation Stack outputs and in the VPC configuration in the console.
Creating private subnets
CloudFormation template: vpc_3.yaml
So we now have our VPC with both an IPv4 and IPv6 CIDR attached. However we have no where to place resources. In order to that we need to create subnets within the VPC. Subnets are linked to Availability Zones and are a small segment of the larger VPC IP ranges. Take a look at the VPC User Guide - Subnets for more details on subnetting.
Although there are many ways to create/design your subnets in a VPC, I tend to lean towards splitting in line with the three tier architecture model (wiki article) as this tends to be the most common and flexible way of allocating space.
Note: It is not possible to resize a subnet one created. It has to be deleted and then recreated.
Based on using 3 Availability Zones for resiliency we will create 3 subnets in each tier giving us a total of 9 private subnets. For each of these subnets we will allocate a IPv4 and IPv6 range.
Below are the IP allocations in the template (available in excel in repo). Generally the application/logic tier tends to have more components so these subnets are sized larger that the presentation and data tiers. I have split across application layer first then allocated to each Availability Zone. This allows easier security for items such as Network Access Control Lists (NACLs) or on-premise firewalls as if required an individual tier can be allowed.

For IPv6 because this range is allocated by AWS we have to use calculation to allocate the subnet part of the IP range and add to the VPC allocation. In the IP allocation file I use a dummy IPv6 VPC range of fc00:1234:5678:9a::/56 to show how the subnets ranges are allocated. As you can see we assign the last 2 digits of the subnet range (in bold) to the provided VPC CIDR.

Note: Apart from the US West (Northern California) region all regions have 3 AZs for new customers
Once complete you will be able to see all the subnets and their associated ranges in both the CloudFormation Stack outputs and in the console. You will notice in the CloudFormation Stack outputs there are also some extra keys. These are to enable easy reference via other stacks, if you use CloudFormation Nested Stack, or resources if you add to this template.
Creating routing
CloudFormation template: vpc_4.yaml
So we now have our VPC and Subnets and can start creating resources if we wish. The resources would be able to talk to each other using the "Default Route Table" that is created when creating a VPC. However, this route table can not then be manipulated in code if we wish to modify those routes. In order to be able to create and amend routes we need to define route tables in code and attach it to the subnets we have created.
At this point we will only create a single private route table as it will only define a "local" route that can be used by all subnet to communicate between themselves. As the need for different routes per subnet/AZ is required we will create separate route tables and attach to the subnets required replacing this single route table.
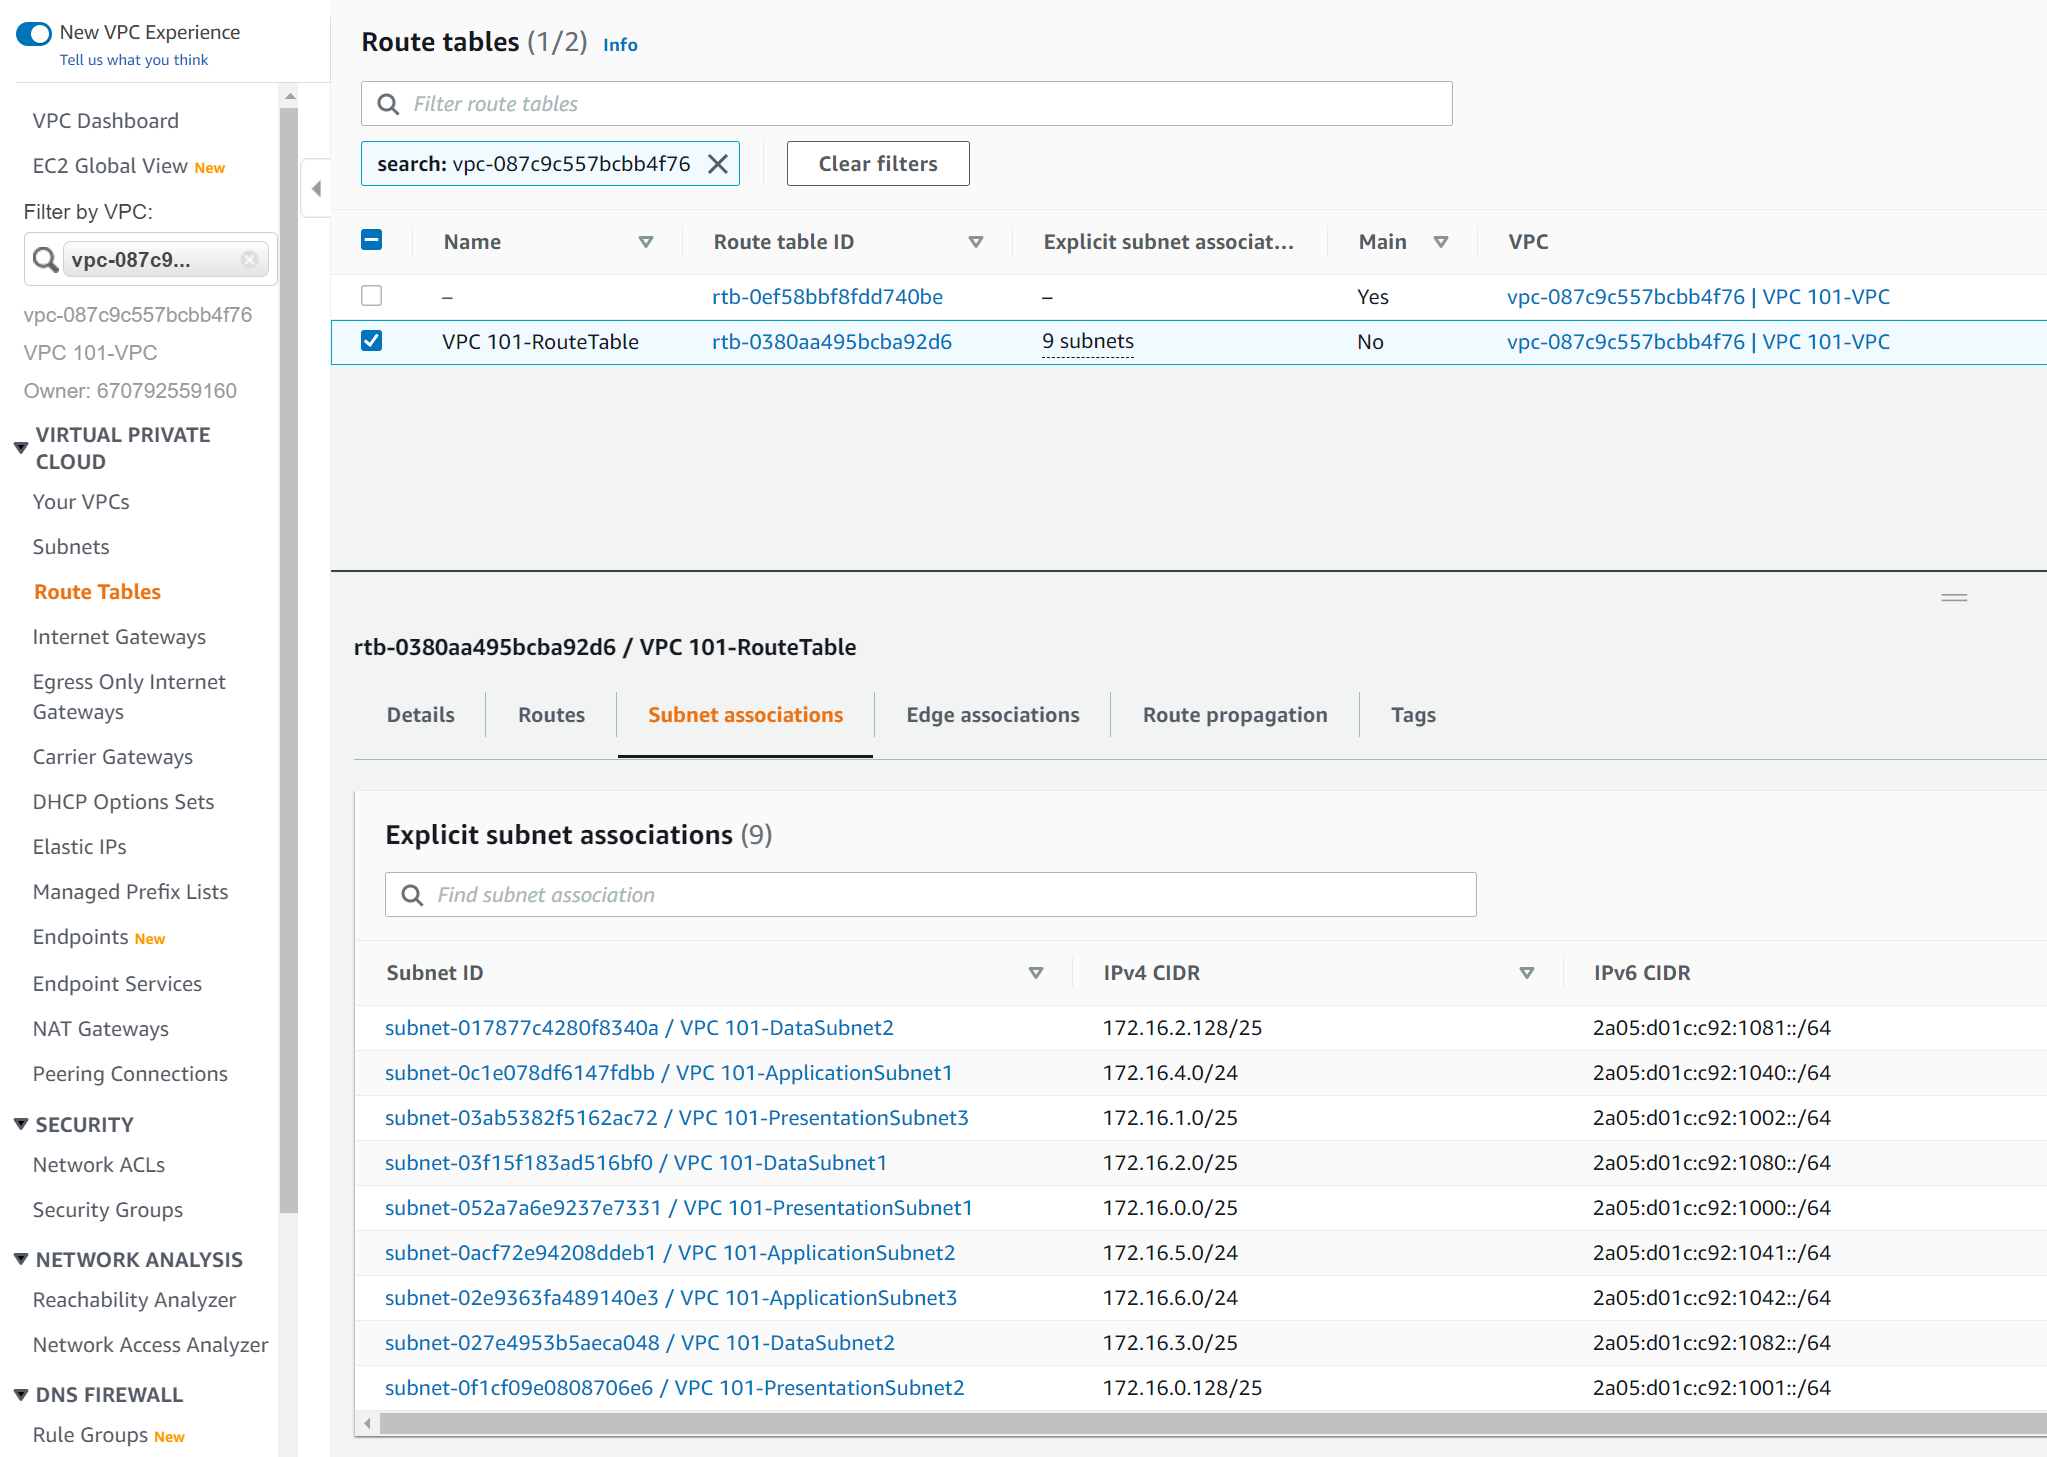
One completed you will be able to see the new route table in the VPC console along with the attachments to our 9 subnets.
Enable VPC Flow Logs
CloudFormation template: vpc_5.yaml
One key item in becoming Well-Architected is ensuring security and operations are included in what we deploy. A key part for both of these items is knowing what is happening (observability) in the VPC. The first, and arguably most valuable, component in this is enabling VPC Flow Logs. Flow Logs can be enabled at the VPC, Subnet or Interface level but by enabling at the VPC level we ensure that logging is enabled on all traffic with out the need to be configured on subnets or components as they are deployed.
We will publish the logs to CloudWatch Logs, to enable easy analysis, as well as S3 for archive. Both CloudWatch Logs and S3 are encrypted using a Customer Managed Key (CMK) provided by KMS that we will create in the template.
The template defaults retention period for CloudWatch Log to 14 days and S3 to 365 days but as they are parameters these can easily be changed.
In an organization, I would expect the S3 bucket to be created in a separate account that is used purely for logging to ensure segregation of duties.
For more information on VPC Flow Logs take a look in the VPC User Guide.


Once the stack update is complete you will be able to see the flow log configuration against the VPC in the console. Usefully it also links to the CloudWatch Log Group and the S3 bucket where the logs are stored.
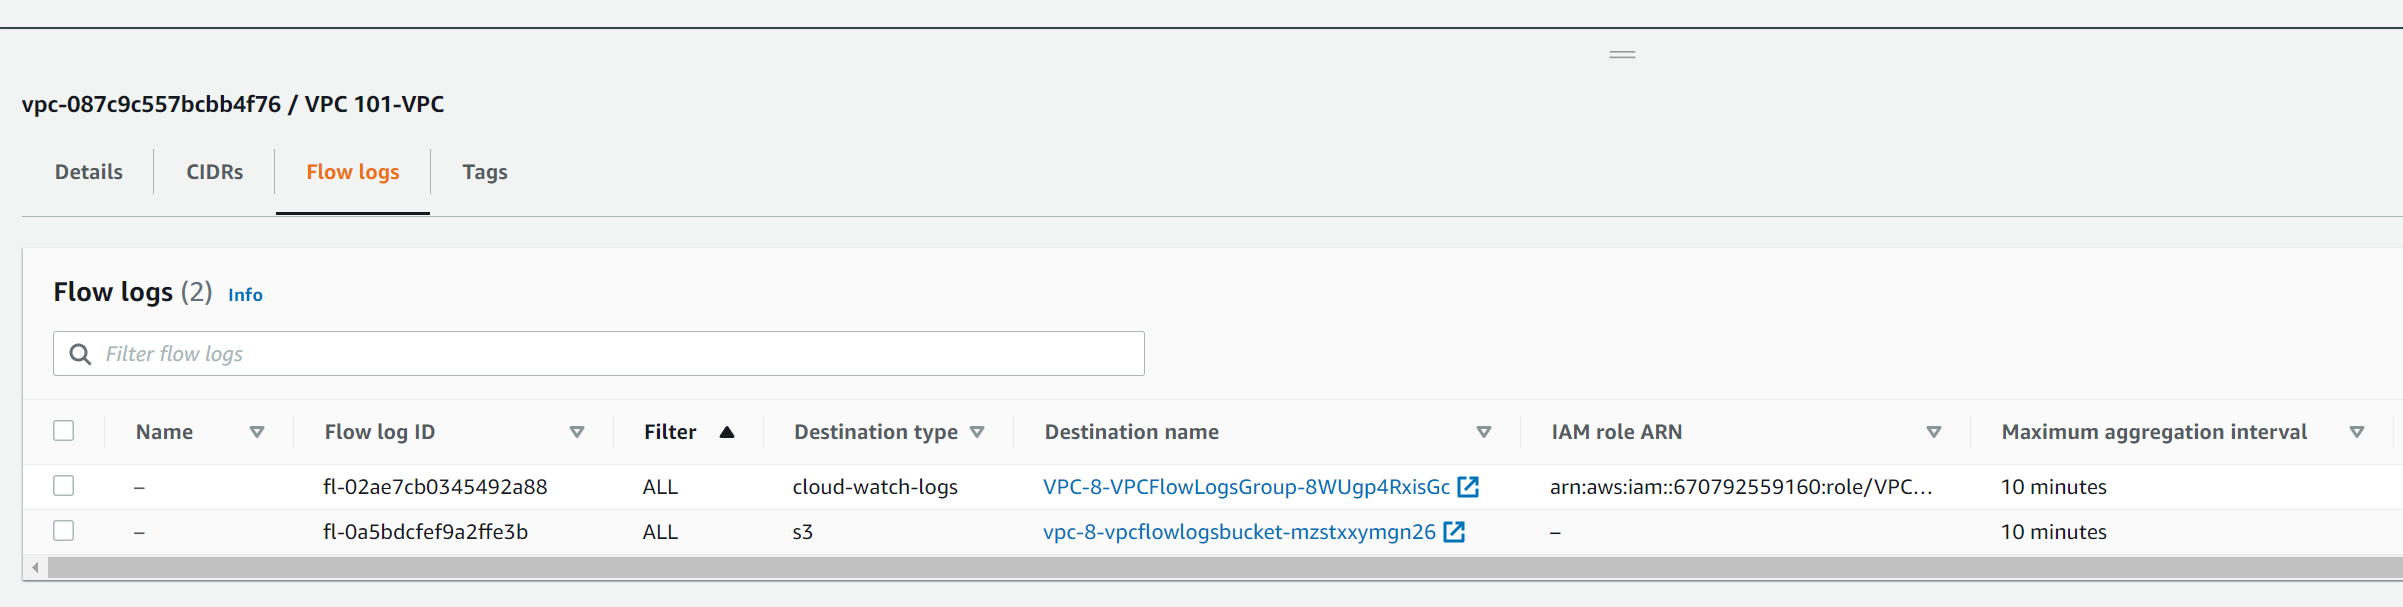
If you look at the CloudFormation Stack outputs you will also see details of the IAM role and Policy as well as the KMS key id.
Deploy VPC Endpoints
CloudFormation template: vpc_6.yaml
At present there is no access to components outside of the VPC. While this is extremely secure it does limit functionality. The easiest way to access AWS services is by using VPC Endpoints. These use the AWS network to connect to the services and are more secure than going over the internet. In addition endpoints have a security group and can have a resource policy to restrict access if required.
If you want to understand more about the benefits of endpoints I did a blog post on the subject here.

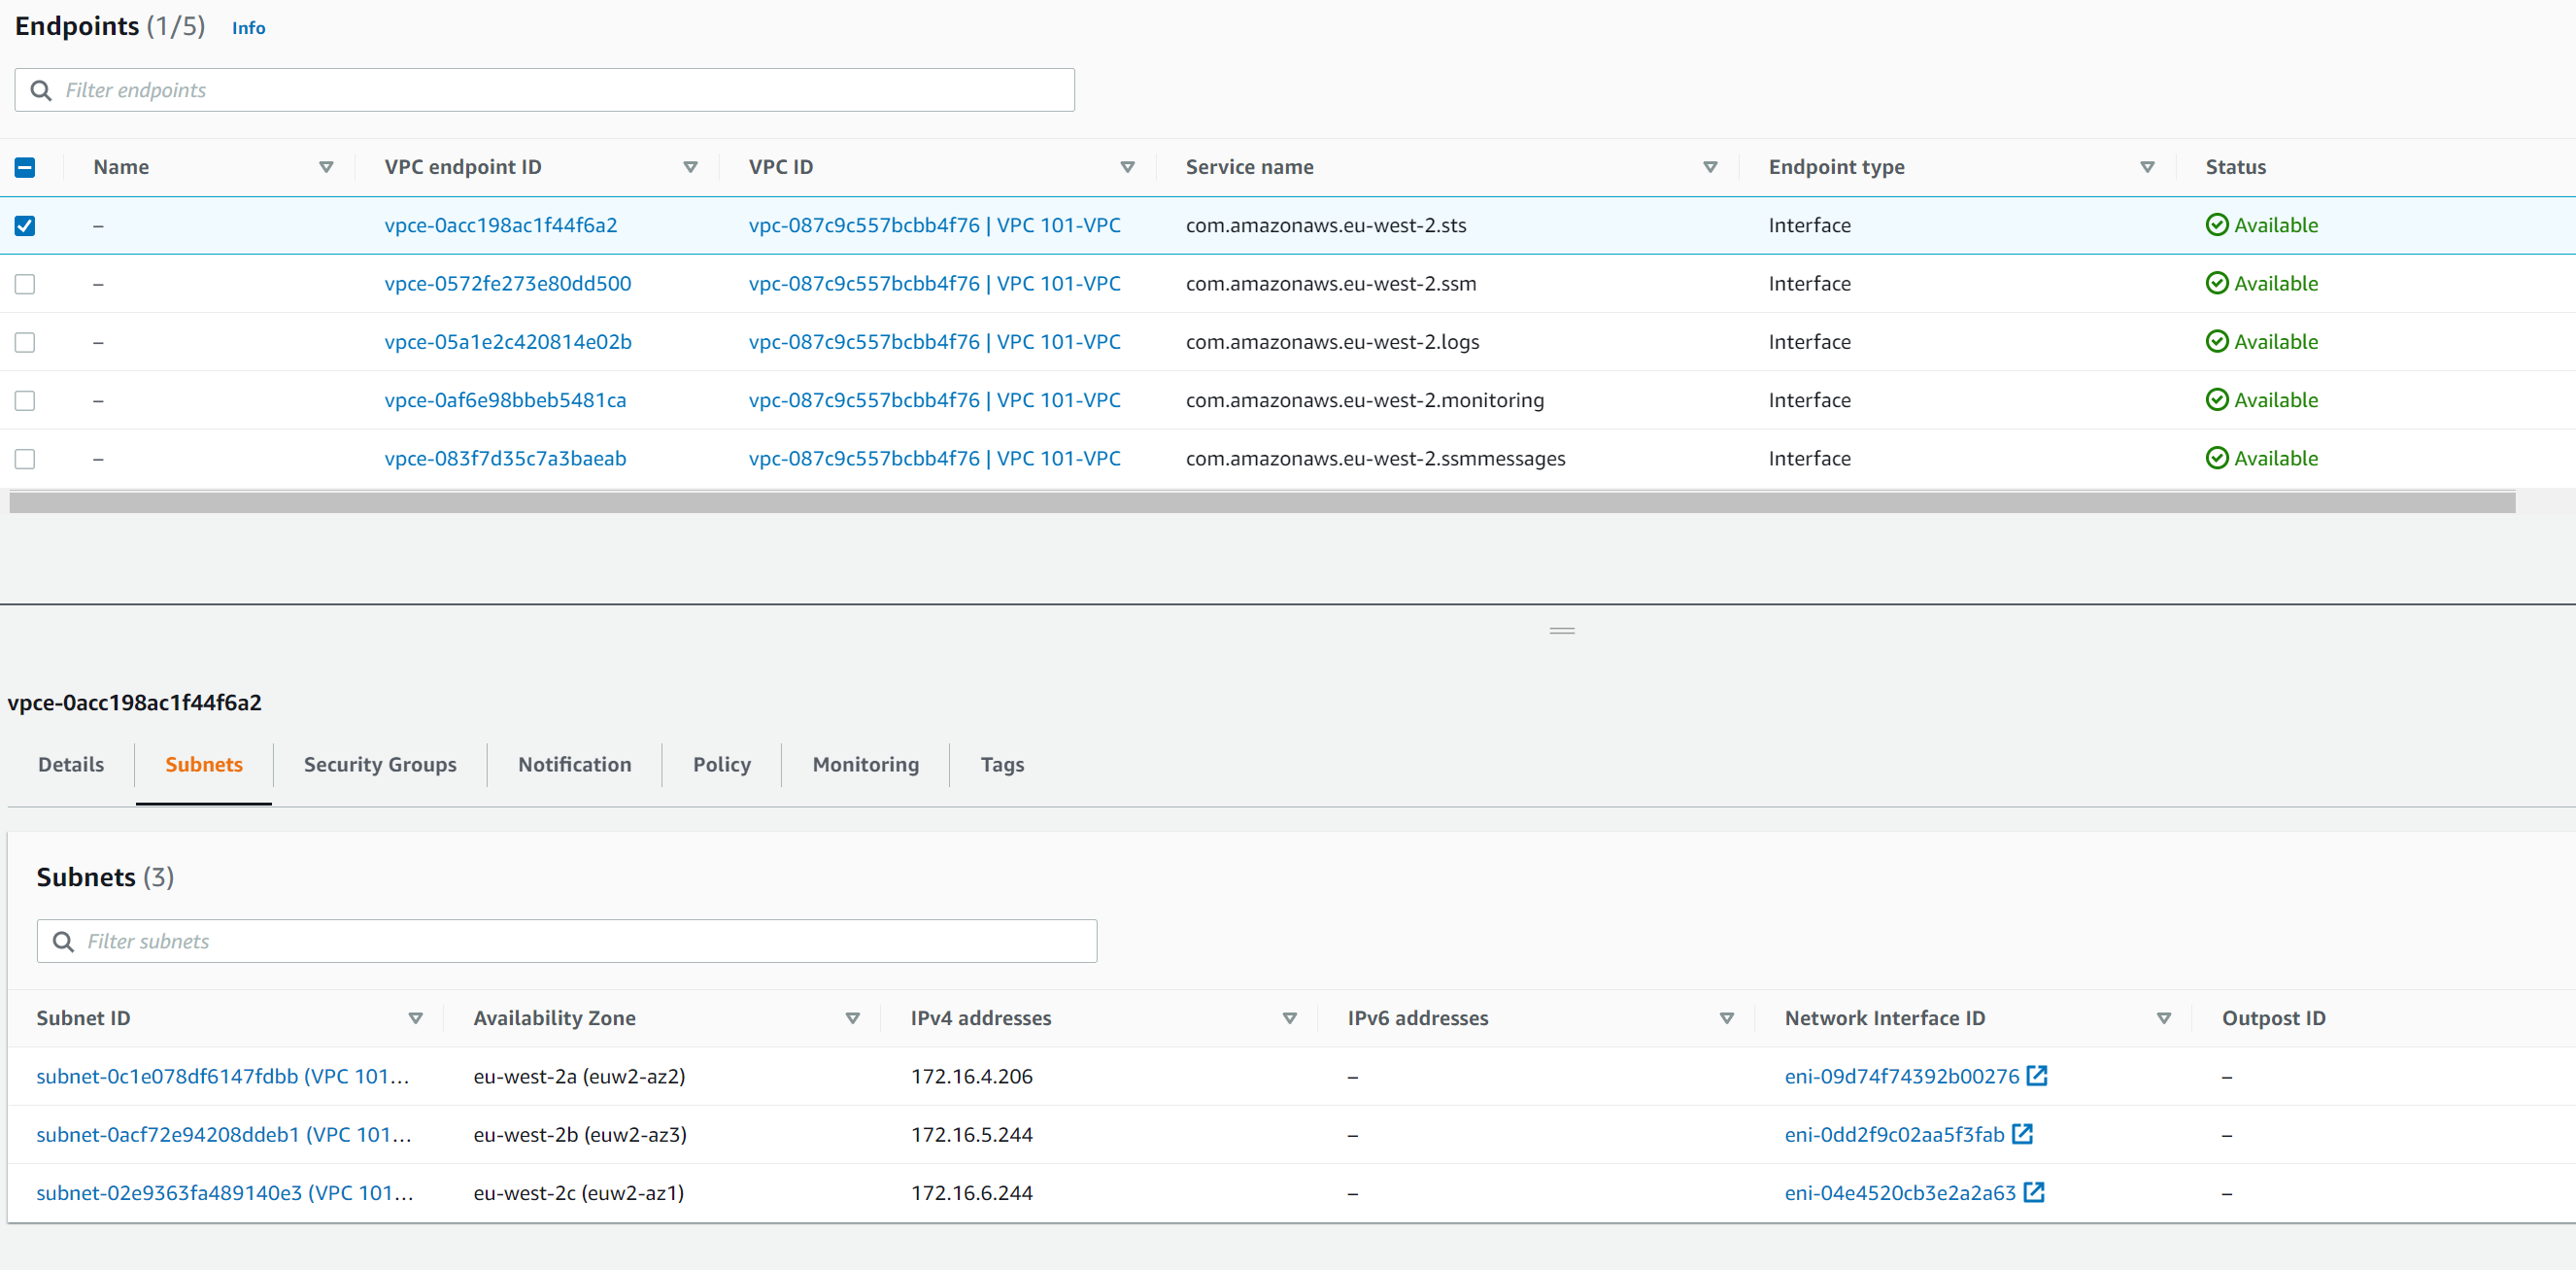
We will deploy all the VPC endpoints that would allow you to assign an IAM Role to an EC2 instance to interact with AWS if required, remote in to EC2 instances via Systems Manager - Session Manager, and use the CloudWatch Agent on EC2 instances to output OS metrics. Whilst there are over 170 service that support endpoints, these should give you enough to understand how they work and how you can provision them for your workloads.
As these are Interface Endpoints we have to create the network interface in a subnet. For these interfaces I will create them in the Application Subnet as this is primarily where the workloads using them will be created. If you chose to create a public subnet this would also be an ideal place to put all VPC endpoints.
Once the endpoints are created you can see them in the console and also the IP addresses of the interface within each subnet.
Now, it might seem that this would then take a lot to be able to use these endpoints. However, if you take a look at the Details tab of the endpoint you will see DNS names for the endpoint.
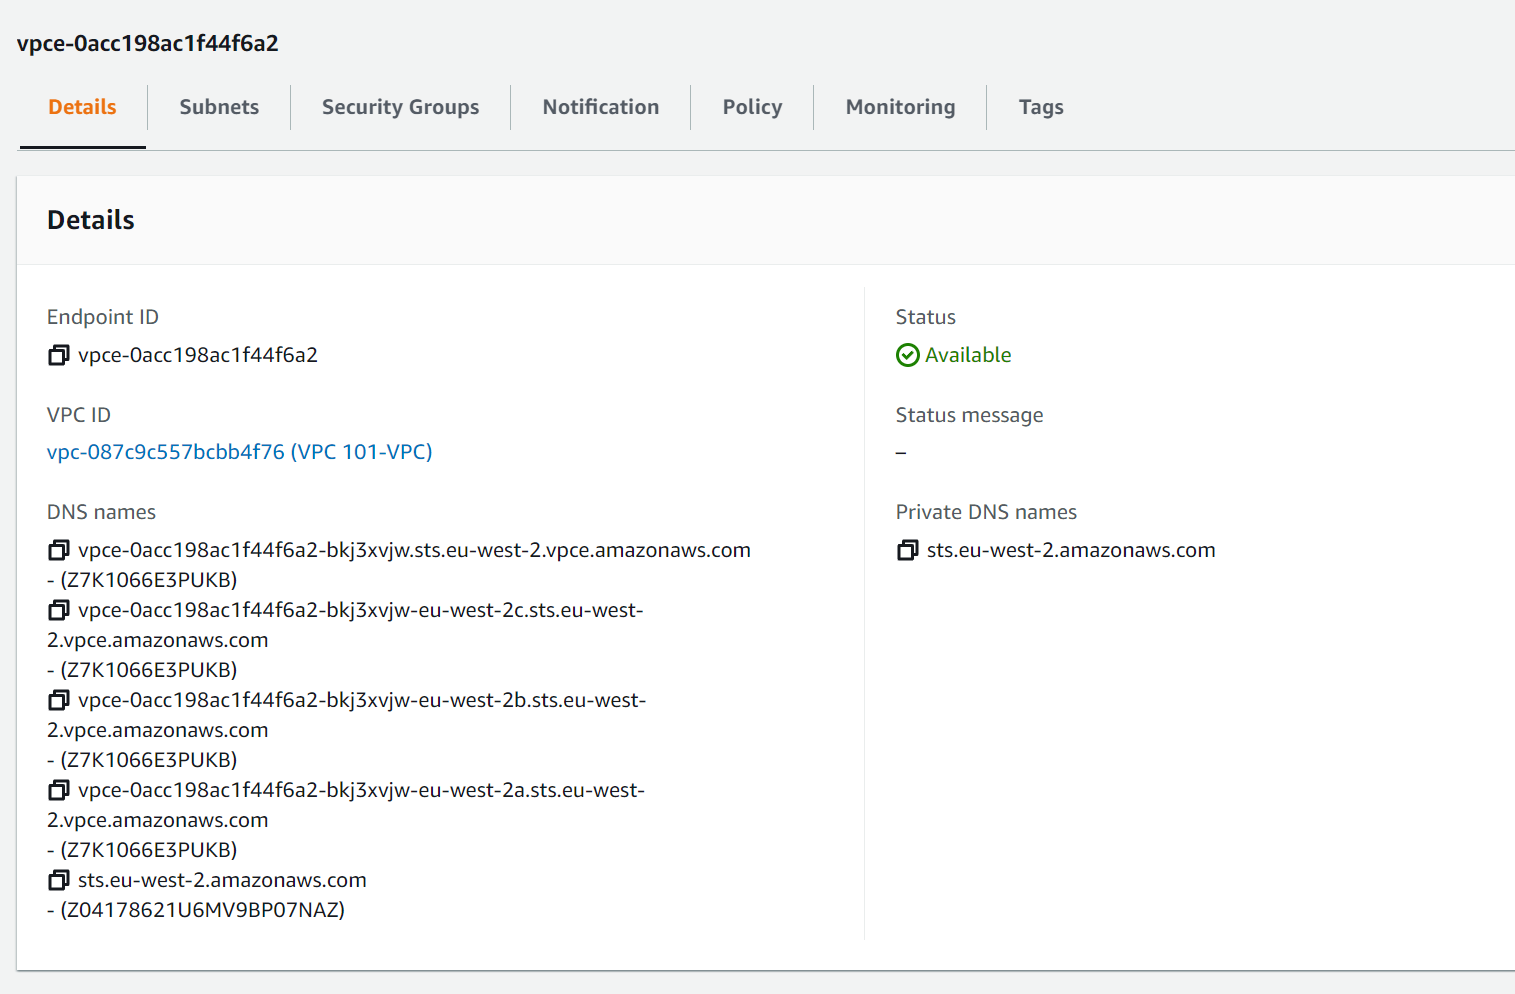
Again, the list of DNS looks daunting and while they can be used and will resolve to the endpoint IPs the item that is more critical is the Private DNS names. This will only resolve in the VPC but the name is the same as the public name for the service. So in this example the external resolution for the STS server sts.eu-west-2.amazonaws.com is 52.94.48.43. Within the VPC resources will use the private DNS resolution which would then resolve to the IPs in the VPC, in our case 172.16.4.206, 172.16.5.244, and 172.16.6.244.
Deploy Internet Access
CloudFormation template: vpc_7.yaml
So we now have a VPC with Subnet and Routing along with access to AWS service that we might require and a way to remote in to EC2 instances. While this might be sufficient for some solutions such as data processing where the output is then in an S3 bucket or sent via SNS or some other servers it will not work for all workloads. In addition some workloads will deploy services that will need access to the internet to either download and other workloads might need to be accessible in order to serve customers.
To enable this and increase security we will create separate public subnets to host internet facing components. For these components we will deploy an Internet Gateway with direct access.
For items in the private subnets that need internet access we will need to deploy a NAT Gateway for IPv4 traffic and an Egress Only Internet Gateway for IPv6 traffic. In addition we will need to create new route tables to allow subnets to access the relevant gateways. As NAT Gateways now support internet and private NAT options we have to specify that our gateway will be for public connectivity.
As mentioned above we will also move the VPC Endpoints to the Public Subnet.
Reduce NAT Gateway Costs
CloudFormation template: vpc_8.yaml
While most components have no charge NAT Gateways cost between 4¢ and 7¢ an hour dependent on the region you deploy to. While this might not seem much, as we are deploying in 3AZs (good practice) this is up to 21¢ and hour.
So in a month with 31 days (744 hours) that equates to $157 just to have them provisioned.
As such we will add an option to reduce this for workloads that do not need it. Using a CloudFormation Conditions we can decide which resources to build based on a input parameter. In our case we will have a parameter (ReducedNAT) that will then set whether we want a SingleNAT or MultiNAT solution. We have set the parameter input to only allow either Yes or No as an option to ensure that we always meet one of the 2 conditions.
If we select Yes we then only create a single NAT Gateway and private route table with all private subnets using the same route table pointing to the single NAT Gateway.
Network Access Control Lists (NACLs)
CloudFormation template: vpc_9.yaml
To improve security at the network level, we are going to create 4 NACLs to control traffic between the Subnets as well as in/out of the VPC. We will create NACLs as follows and associate to the relevant subnets:
- Public Subnets NACL
- Presentation Subnets NACL
- Application Subnets NACL
- Data Subnets NACL
The diagram below shows the flows that will be enabled by the NACLs. I use common rule numbers across NACLs as I believe it is simpler to be able to match them up. For example rule 1xx is used for outbound internet IPv4 traffic and it's reply traffic in all NACLs. I also group IPv4 and IPv6 so NACL entries together. For example rule 200,201,202, all provide the same access between the presentation and applications subnets.
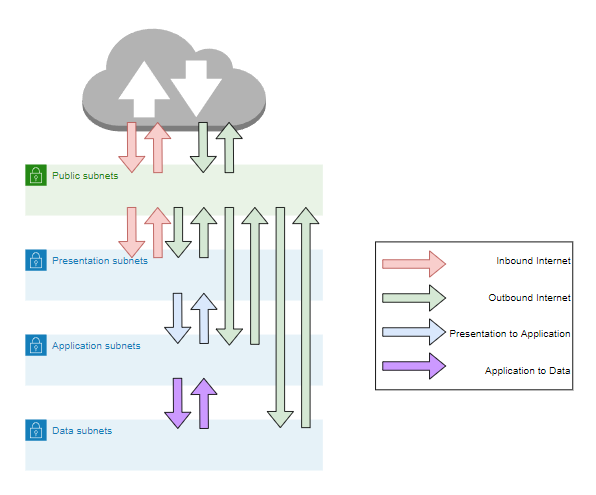
In the Public Subnet NACL firstly we are going to create rules which will enable inbound traffic from the internet on port 443 (HTTPS) and its reply traffic on ports 1024 to 65535 (Ephemeral Ports) using IPv4 (rule10) or IPv6 (rule11). This will allow access to resources we might host in the public subnet such as load balancers or API Gateways, but only over the secure HTTPS protocol. Secondly we are going to create rules that allows all VPC components to access the public internet on port 443 (HTTPS) and the reply traffic on ports 1024 to 65535 using IPv4 (rule100) or IPv6 (rule105). This enables devices in any subnet to talk to the internet over HTTPS and the reply traffic. For those devices in the Private Subnets this is via the NAT devices.
In the Presentation Subnet NACL firstly we are going create the inbound internet rules that will allow devices in the public subnets to talk to the presentations subnet on port 443 and the reply traffic on ports 1024 to 65535 using IPv4 (rule10, 11, 12) or IPv6 (rule15, 16, 17). This will allow devices such as load balancers that are routing internet traffic to talk to components in the presentation subnet only over HTTPS matching rules 10 and 11 in the Public Subnet NACL. Secondly we are going to create rules that correspond to rules 100 and 105 in the Public Subnet NACL for outbound internet traffic. For IPv4 this is rules 100, 101, 102, and for IPv6 this is rules 105, 106, 107. Finally we are going to allow devices in the presentation subnets to talk to the application subnet on ports 1 to 1023 (Common Ports) and the reply traffic on ports 1024 to 65535 using IPv4 (rule200, 201, 202) or IPv6 (rule205, 206, 207). This will allow components such as web servers to talk to components in the application subnet and the reply traffic.
In the Application Subnet NACL firstly we are going to create the same outbound internet rules as in the presentation subnet (100, 101, 102, 105, 106, 107) that correspond to rules in the Public Subnet NACL for internet traffic. Secondly we are then going to create rules 200, 201, 202, 205, 206, and 207, which correspond to the same rules in the Presentation Subnet NACL to allow traffic between the presentation and application subnets. Finally we are going to allow devices in the application subnets to talk to the data subnet on ports 1 to 1023 and the reply traffic on ports 1024 to 65535 using IPv4 (rule300, 301, 302) or IPv6 (rule305, 306, 307). This will allow components such as application servers to talk to components in the application subnet such as databased and the reply traffic.
In the Data Subnet NACL, again we are firstly going to create rules 100, 101, 102, 105, 106, 107 for inbound internet traffic. that correspond to rules in the Public Subnet NACL. Secondly we are then going to create rules 300, 301, 302, 305, 306, and 307 that correspond to the same rules in the Application Subnet NACL to allow traffic between the application and data subnets.
Once deployed take a look at the NACLs, you should have the following rules in each list. Note, this relatively open but we would further control access with Security Groups around resources.

What's Next?
Clean Up
The cost of this solution according to the AWS Pricing Calculator is $126 for the London Region (see estimate). While that's not much it would equate to about $1,500 for the year. The reduced NAT option's estimate for the same region is $54/month or $650 a year. So, unless you need to use it I'd suggest deleting the stack once you've had a look at how a VPC and it's components work.
Future Updates
If you take a look at the Git repository for this post you can see the current roadmap. Once those items are created I will come back and update this post. At present the items I have plans for are:
- IPv6 only subnets and networking devices.
- Option for no NAT
If you want to contribute or recommend updates on the solution please feel free to either leave a suggestion here or create a pull request on GitHub.
 myawsrocks
As always, I hope this has been useful for you and I'd welcome any feedback on both the technical content and style of writing of this post.


Member discussion